
It all started with a desire to build something and garden year round in Ontario, Canada. I had just spent the summer gardening after building an elaborate arrangement of potted plants and vegetables on my back porch in downtown Toronto. The cold was on its way and the inevitable end of planting season.


After a week away at a cottage up north my mother-in-law Christine and I, decided we would build a greenhouse and make it winterized! We would search out old doors and windows as the walls. I must admit, Pinterest may have helped nudge us along. Having worked in the window and door trade most of my life I had a feeling I could obtain a fair amount of the materials through contacts and searching the city.
The two doors pictures below were the first of the bunch and were purchased off of Facebook Marketplace. A tool I have found very useful for my upcycling needs. For the last 100 plus years these two doors were dividing doors between the living room of a home in East York Toronto. They now have a second life as the feature doors at the front of the greenhouse.


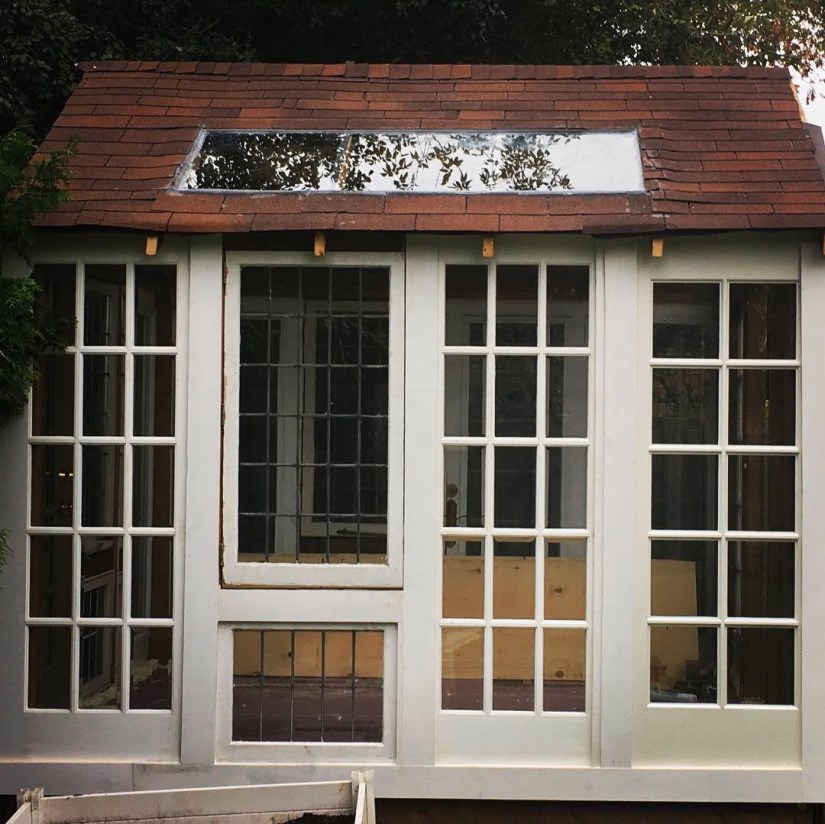
The second pair of doors I also purchased off of Facebook Marketplace. These doors were also separating the living and dining rooms in a home in Mississauga for over 30 years. What I enjoy in both cases, was that each individual saw the beauty in the doors even though they had reached the end of their purpose within each home. They have so much character! The only negative is they are all interior doors with single pane glass, thus the R value is next to zero and they required an exterior paint to withstand the Canadian weather. These two doors now have a second life as part of the feature side of the greenhouse.


The rest of the doors and the windows were obtained from a friend who installs for Ridley Windows and Doors. Dave Darvince was kind enough to drop the doors off to my home as it would have taken me at least four trips to get them all. The doors came from an install in downtown Toronto. All of these were exterior doors with double glazed glass, thus much more appropriate for the structure we were building.


We now had all the windows and doors required to get us started. My father-in-law and I loaded up the doors and windows and transported them to his place in Whitby, Ontario where we would construct the greenhouse.


The structure itself went up fairly fast but first I had to prepare the area. Two large planters had to be moved, no easy task. Now in hindsight, even though we checked with the neighbours before building, I will never again build as close to a fence, hedge, or any other impeding object. It made working on the back and right side very difficult.


After moving any impeding objects and marking the general work area it was time to dig four holes to set the foundation blocks. I then filled the holes with gravel and levelled them to the same height.


Next, we installed the main 4×4 posts with the bottom plate, followed by attaching the top plate.


We then installed the floor joist and added blocking underneath. Next, we bolted all the corners at the top and bottom, adjusting to ensure plum and square along the way. After, ¾ inch plywood was installed as the subfloor.


When we designed the greenhouse, we decided to build it to 10 feet by 8 feet in order to stay within measurements required to avoid building code requirements. We then installed the doors in order of which ones Christine liked the most. We placed the doors on top of the subfloor and screwed them into the top plate, directly through the doors. On the inside I cut 2×2 wood pieces (attached to subfloor) to screw the bottoms of the doors into. I used the same 2×2 wood pieces along the perimeter of each window location (one on each side, and one at the middle back).


The windows are lovely, but they are also single pane. The hardware was in bad shape so I took it all off and re-hinged each of them using hinges from another set we had gathered. Below, you can see how I marked out each new hinge, chiseled them out and attached the new ones for installation.


Next, I installed the windows. However, later after installing the rafter joists it became apparent I had to lower each window a couple inches to allow them to move freely.


Once the rafters were up and reinforced I was able to install ¾ inch plywood.


For the front doorway, I had installed several 2x4s to get the desired width for the door we had selected. Regardless, when framing a door, you always want at least two 2x4s on the hinged side for proper operation and security. It was at this point in the build we discussed adding a skylight to allow more light into the greenhouse. At first we tried PVC plastic for the skylight but it became apparent quickly that it was too weak and would crack once the climate became cold. Thus, I searched out local window and door companies close by and found Canada Windows and Doors. There I met with their owner Andy Van Hoof and was able to assist me in obtaining a few sliding doors. I took the door apart and installed it on the roof with a some expanding foam strips on the bottom to allow for movement during weather fluctuations.


In hindsight, I should have waited to get my hands on double glazed glass, as this sliding door glass was single pane. Next, I covered the plywood roof with a protective roofing material in preparation of installing the shingles.


I primed all the wood around the skylight. Later after installing the glass, I sealed it with caulking and blue skin primer with blue skin over top, followed by flashing. I then shingled the roof with brown shingles Dave and I had purchased. I remember thinking Christine had said she wanted black, but I said nothing. That cost me twenty hours work and a bunch of wasted shingles, that upset me more than the time wasted. However, I had only shingled once in my lifetime so I was happy to have a chance do it over as I was not 100% satisfied with how it looked finished. When I took off the brown shingles I also decided to raise the skylight to ensure it was waterproof. During this I managed to break the glass so I was happy to have a spare one just in case!


In this picture you can see more than a few imperfections and more importantly it was not what the client wanted!
Likewise, there was a good chance water would infiltrate the skylight. At that point I decided to build a ladder truss for the front of the greenhouse to both enhance its appearance and provide room for a solar panel Christine bought.


Christine had also purchased two old stained glass windows from a market. Both are over a hundred years old from a church in England. I attempted to find the location but was not able to find the information for this story sadly. Both needed a fresh coat of paint to freshen them up!


I installed each of these in the middle of the greenhouse above the doorway. I was quite pleased how all the lines match up with the old leaded glass windows we obtained. After, raising the skylight it was time to shingle again, this time with the correct colour.


After the roof was complete, it was time to add insulation to the floor. I used 2 inch thick rigid insulation with a high R value. Followed by ¾ inch plywood. Next, it was time to tile. Christine and I thought it would be best to use a dark colour to help absorb the warmth from the sunlight.


Here I simply found my center lines and started tiling from there out to maximize my cuts and ensure the tiles were properly centered.


Once the tiles were done, I was able to determine the door height. I cut the door to the required height and began to frame out the doorway. This was complex but I managed well.


After, it was time for trim, trim, and more trim. This part took much longer than I expected. For many of the doors were different widths, thickness, and height. Thus, to hide all the imperfections and beautify the greenhouse I added a substantial about of trim. We bought trim boards that were approximately 10 inches wide by 8 feet long. Before cutting to size, I painted the majority of it and even managed to get my eldest daughter Josephine to help out.


As you can see in the pictures, the inside and outside of the greenhouse transformed with the addition of trim.


The windows had to be trimmed out in more detail to make them more air tight.


Trim had to be added on the outside and inside, making sure not to impede the operation of the windows.


After installing the old stained glass we were left with four triangles. We could have simply covered up with wood, but we wanted to maximize the sunlight coming in and we liked how it looked. So I built some framing around each window sash and then used cheap thin styrofoam from the dollar store as templates. This way I could cut them to exact size for the opening. Always leave 1/8 spacing around the perimeter of the glass to allow for the wood expansion and compaction during weather changes.


We have even had our fair share of visitors already, some of which I caught on camera.


Next, it was time to add insulation and vapour barrier to the roof. I had to frame out around various parts of the rafters and blocking so that I could properly attach the plywood later.


Before I could complete the insulation though, I had to install the solar panel and run the wiring through the roof. It took a while to find what we needed and where to buy the mounting kit. Sentinel Solar in Vaughan had just what we needed. Four mounting plates had to be installed with a hole drilled in near the middle towards the end where the wires come out of the panel. We decided a shelf for the battery would be handy.


With the help of a friend (Trever Penford) who saw my Facebook post about requiring just a few batts of insulation, I was able to finish off insulating the ceiling.


Next, came the complicated part of covering the ceiling with plywood while working around the ceiling joist so as to keep the exposed. Likewise, trimming around the window was somewhat difficult.


Here I simply framed out around the skylight, installed trim on all sides and place insulation within open spaces to avoid cold spots. Also, I tried to use left over cutoffs to cut down on waste.


It was difficult installing large pieces of plywood or trim as the ceiling joist got in the way. Finally, it was time to caulk and paint.


We are now at the stage of setting up a heating system with the solar panel providing the energy to a battery for storage. Either a heating mat or small power heater may be used. Also, we have researched using large barrels, painted black, and filled with water (making sure to have the ratio of water match the exposed glass surface). Likewise, during summer we may have to use some type of shading system possibly with a fan to keep air flow moving to prevent the plants from overheating.
Regardless, this project emphasizes how “trash” can have both a useful and attractive use after its first life span has come to an end. With some creativity, hard work and investment the possibilities are endless. In the future I plan to build fences, enclosed porches, furniture, and various options of small structures like this greenhouse.
If you’re interested in any of these projects and enjoy helping the environment, please feel free to contact me through this website or follow me on Facebook to keep up with our upcoming projects!!
